Email Marketing with Mailchimp~A Beginner’s Guide
Mailchimp a Beginners Guide, will set yours up to send marketing emails to your customers.
Email marketing remains a cornerstone of business communication and marketing strategy. It offers a direct line to your audience's inbox, and it allows for personalised engagement and promotion.
One of the leading platforms in this space is Mailchimp, renowned for its user-friendly interface and robust features. Whether you're a small business owner, a freelancer, or part of a larger organisation, understanding how to leverage Mailchimp can significantly enhance your marketing efforts. Here's a beginner's guide so you can get started with Mailchimp. From signing up to sending out your first email campaign.
Who is Mailchimp?
Founded in 2001, Mailchimp has evolved from a simple email marketing service to a full-fledged marketing platform. Not only does it cater for email marketing to businesses of all sizes, it also now has websites, automation, analytics, and more.
Mailchimp's appeal lies in its simplicity and scalability, so it makes it an excellent choice for marketing novices and seasoned professionals alike.
How to Sign Up with Mailchimp
Getting started with Mailchimp is straightforward. Follow these steps to sign up
-
Firstly Visit the Mailchimp Website
Go to mailchimp.com and click on the "Sign Up Free" button. Mailchimp offers various plans, including a free tier perfect for beginners and small-scale campaigns.
-
Enter Your Details
You'll be prompted to enter your email, a username, and a password. Ensure your password is strong to protect your account.
-
Confirm Your Email Address
After submitting your details, Mailchimp will send a confirmation email to the address you provided. Open this email and click the "Activate Account" button.
-
Set Up Your Account
Mailchimp will ask for additional information to tailor the platform to your needs. This includes your business name, website (if applicable), and physical address (a requirement for anti-spam laws).
-
Choose Your Plan
Select a plan that fits your needs. The Free plan is a great starting point, allowing you to send up to 10,000 emails per month to 2,000 contacts.
- Finally You're In! Once your account is set up, you're ready to start using Mailchimp. Take a moment to familiarise yourself with the dashboard.
Next Gathering Emails for Mailchimp

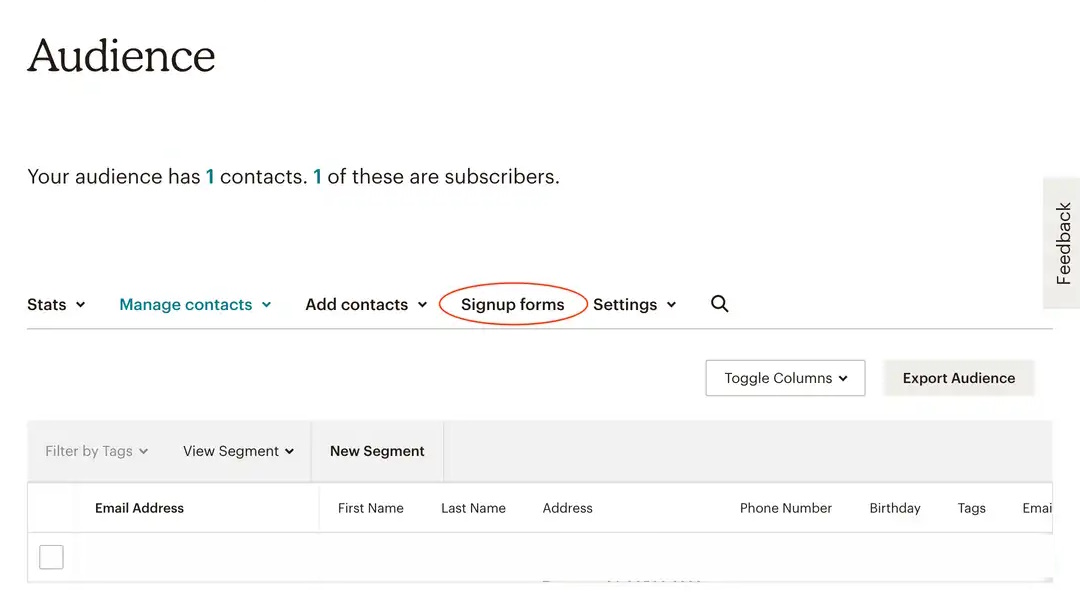
This can be done through adding a widget to your website.
-
Signup Forms
Place signup forms on your website, predominantly the footer area, so it allows visitors to subscribe to your email list. Mailchimp provides customisable signup forms such as pop-up forms, embedded forms, or inline forms.
Launching Your First Email Campaign
Your account ready, so it's now time to create and send your first email campaign. Here's a simplified process
-
Create a New Campaign
In your Mailchimp dashboard, click the "Create" button, then select "Email" and choose "Regular" to start a standard email campaign.
-
Name Your Campaign
Give your campaign a name so that it's easy to identify, rather than it getting messy down the track.
-
Select Your Audience
The first time you use Mailchimp, you will need to manually upload your names (if you have any), then choose who will receive your email. If you already have names added via the Mailchimp form, you can send it to your entire list or segment it based on criteria like location, engagement, or past behaviour.
-
Design Your Email
Mailchimp offers a range of templates and a drag-and-drop editor to design your email. Add your content, images, and call-to-action buttons. Remember, clarity and simplicity are key to engagement.
-
Preview and Test
Use the preview feature to see how your email looks on different devices. You can also send a test email to yourself to ensure everything appears as intended.
-
Schedule or Send
Choose when you want your email to go out. Firstly you can send one to yourself to make sure it's ready. Then you can choose to send it immediately or schedule it for a later date and time.
-
Analyse Your Results
After sending your email, monitor its performance through Mailchimp's analytics tools. Look at open rates, click rates, and other metrics to understand your audience's behaviour and preferences.
Tips for Successful Email Campaigns
-
Know Your Audience
Tailor your content in order to meet the interests and needs of your subscribers.
-
Consistency is Key
Predictable emails build trust with your audience when you are regular, .
-
Test and Learn:
Experiment with different subject lines, so you can work out which content formats, and sending times works best.
Finally, Mailchimp is a powerful tool for anyone looking to start with email marketing. By following these steps, you'll be well on your way to launching successful email campaigns that engage and convert. Remember, the key to effective email marketing is continuous learning and adaptation to your audience's evolving needs.
Happy emailing!
